
Many have written about the future of Artificial Intelligence (AI) and its potential in our personal and professional lives. So far, most of the literature describes the impacts as “futuristic” and arriving several years from now. But did you know that you can take advantage of AI today? More specifically, AI is available in many of your favorite Microsoft Office applications, and taking advantage of these tools can provide tremendous benefits. Read on, and in this article, you will learn about four specific instances of artificial intelligence in Office applications.
Word's Editor Feature
Let me begin by admitting that I do not consider myself a good “native” writer. That means that as I write articles such as this, I typically struggle with sentence structure, punctuation, and the like. In the past, I engaged an editor to assist me in “cleaning up” my text. However, with Word’s Editor feature – which became available with Word 2016 – the need for outside assistance is diminished dramatically.
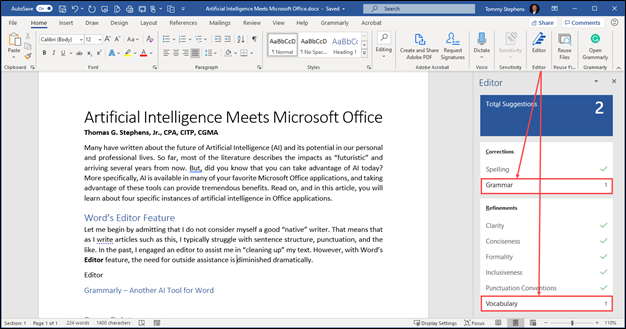
Figure 1 - Word's Editor Feature As An AI Tool
As shown in Figure 1, Editor examines my document it real-time and alerts me to issues that potentially require action. In the example presented, Editor recommends that I address two items – Grammar and Vocabulary. I can click on issues that Editor raises, and it provides recommendations to improve the readability and quality of my document.
For example, clicking on Vocabulary opens the Editor pane shown in Figure 2. In that pane, I can choose to accept or reject the AI-driven suggestions. I can also modify the setting Editor uses to deliver its Artificial Intelligence-based recommendations to me. In sum, I find Editor to be a terrific assistant that helps me create documents that are free of punctuation and grammatical errors. Moreover, Editor’s recommendations help create passages of text that are easier for readers to comprehend.
For example, clicking on Vocabulary opens the Editor pane shown in Figure 2. In that pane, I can choose to accept or reject the AI-driven suggestions. I can also modify the setting Editor uses to deliver its Artificial Intelligence-based recommendations to me. In sum, I find Editor to be a terrific assistant that helps me create documents that are free of punctuation and grammatical errors. Moreover, Editor’s recommendations help create passages of text that are easier for readers to comprehend.
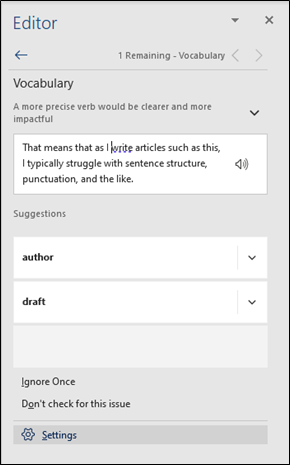
Figure 2 - Editor's Vocabulary Pane
Grammarly - Another AI Tool for Word
In addition to Editor, I use Grammarly (www.grammarly.com), a tool that provides a second set of Artificial Intelligence-based recommendations on the documents that I create. Grammarly is a subscription-based service, with a free option available. However, I found the Premium subscription ($139.95 annually) to suit my needs better.
Grammarly’s Premium subscription appears to have a more comprehensive set of rules and writing standards than Editor. Further, Grammarly allows me to define the tone I want to convey in my text, and, upon doing so, it tweaks its recommendations to ensure I meet my objectives. It even works in Outlook, helping to ensure that my outbound email messages are error-free.
Both Editor and Grammarly provide outstanding (and often needed!) functionality. The Artificial Intelligence engines that power these tools are terrific. If you are currently using Word 2016 or newer, check out Editor. Additionally, if you want to go deeper with AI as a means of improving your writing, take a careful look at a Grammarly subscription.
PowerPoint's Design Ideas Feature
Artificial intelligence meets Microsoft Office in other applications besides Word. For example, PowerPoint now boasts a feature known as Design Ideas, which you will find on the Home tab of the Ribbon. Design Ideas appeared with PowerPoint 2019. This feature provides users with recommendations to improve the appearance of a slide in a presentation.
To illustrate the effectiveness of the AI-based Design Ideas feature, consider the image in Figure 3. In that image, I used PowerPoint’s Design Ideas feature to convert the tired-and-stodgy bullet point slide at the top of the image to the more modern and contemporary one at the bottom of the image. And all that was necessary to achieve those results was to click Design Ideas on the Home tab of the Ribbon. Upon clicking Design Ideas, PowerPoint provided ten alternatives to the original slide.
To illustrate the effectiveness of the AI-based Design Ideas feature, consider the image in Figure 3. In that image, I used PowerPoint’s Design Ideas feature to convert the tired-and-stodgy bullet point slide at the top of the image to the more modern and contemporary one at the bottom of the image. And all that was necessary to achieve those results was to click Design Ideas on the Home tab of the Ribbon. Upon clicking Design Ideas, PowerPoint provided ten alternatives to the original slide.
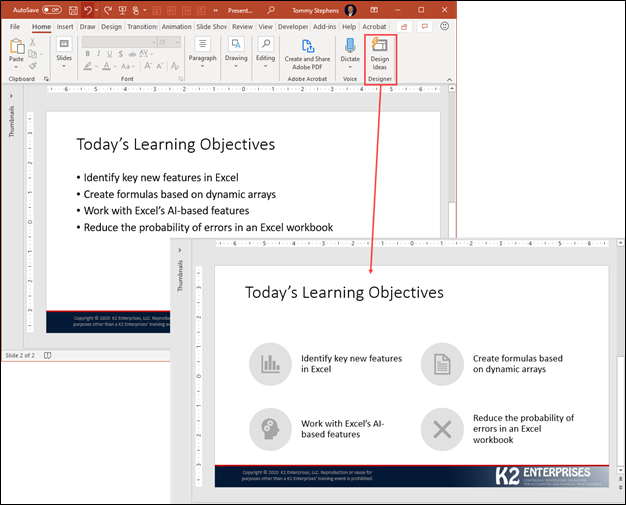
Figure 3 - Using Design Ideas In PowerPoint
Like Editor and Grammarly, Design Ideas in PowerPoint uses Artificial Intelligence to help us get better results in less time. More specifically, Office Intelligent Services powers Design Ideas and other AI-based features available in Office.
Artificial Intelligence in Excel
Not to be outdone, Artificial Intelligence meets Microsoft Office in Excel too. Features such as Stock and Geography Data Types, Dynamic Arrays, and the ability to insert data into a spreadsheet by taking a picture are all examples of Artificial Intelligence available in our spreadsheets. So, too, is Excel’s Ideas feature.
Ideas is an Excel tool that can quickly analyze your data and help you uncover trends, outliers, and other observations. Importantly, Ideas can help you identify issues that you may have missed with the human eye. When you use Ideas, you are taking advantage of Artificial Intelligence to analyze data more thoroughly and faster than could be done with traditional manual procedures.
To take advantage of Ideas, click in the data in your spreadsheet. Then click Ideas on the Home tab of the Ribbon. Excel will take over from there and create numerous charts, PivotTables, and other analyses for you, resembling the output shown in Figure 4. Moreover, you can even type a command such as “Total Order Amount” directly into the Ideas pane, and Ideas will respond with an answer. For those who are afraid that they might miss key trends, observations, and outliers in their data, the Artificial Intelligence features available in Ideas may be the solution needed.
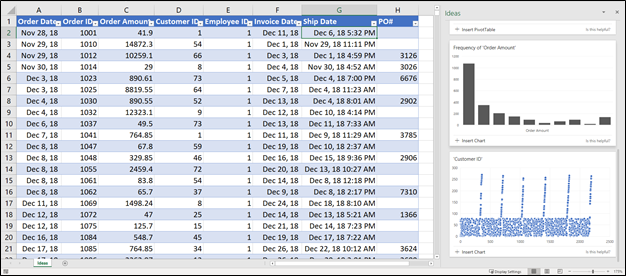
Figure 4 - Using Excel's Ideas Feature
Summary
For many, Artificial Intelligence once seemed like something that was a great concept but would never materialize at a practical level. Yet today, Artificial Intelligence appears quietly in ways that many have yet to recognize. Examples of this spread include the ways that Artificial Intelligence meets Microsoft Office and enhances the various Office applications. If you have not yet explored these tools, now might be the time to see how helpful they can be for you. Further, keep your eyes open for other new features in applications and services that you use every day – many of them will likely incorporate Artificial Intelligence too!
Interested in learning more about Artificial Intelligence or Microsoft Office Applications? If so, consider a K2 Enterprises CPE course. Click here to view your options.
Interested in learning more about Artificial Intelligence or Microsoft Office Applications? If so, consider a K2 Enterprises CPE course. Click here to view your options.
 RSS Feed